I just built up a new demo environment for BI with Windows Server 2012, SQL 2012 SP1 and SharePoint 2013. This is primarily to take advantage of the new Power View enhancements that came out with SQL 2012 SP1 but I do step through getting all the other BI services up and running. What follows is a general guide, providing an overview of the main steps and links to other information where necessary. I am focusing on the SQL and SharePoint install here, so I assume you have a Windows Server installation ready and have setup a domain and DNS services. I used Windows Server 2012 for my VM.
Pre-requisites
- If you don’t have an internet connection from your VM, make sure you have downloaded the Sharepoint 2013 pre-requisites. An in-depth guide exists on TechNet which discusses options on obtaining the pre-requisites, and then this guide will help you install them quickly.
- Then you will also need the following
- Windows Server 2012
- Microsoft Office 2013 (Excel and PowerPoint)
- SharePoint 2013
- SQL Server 2012 Samples. It’s a good idea to deploy all these to test all your features are working as expected.
- Visual Studio 2010 Tools for Office Runtime. The MDS Client for Excel and PowerPivot 2012 will need this. You can get these clients and other goodies in the SQL Server 2012 Feature Pack
- SQL Server 2012 Data Mining Addins
Installing SQL Server 2012
- Ensure Windows has the Active Directory Domain Services role instealled. This is important so we can use a proper domain account for services. Ive seen problems when using built in service accounts. It will suggest you add in the DNS Server role a well. I did so. In my virtual machine I setup 2 network adapters – one with a fixed IP on an internal virtual LAN Segment, the other bridged so it could access my host’s internet connection.
- Install a DEFAULT instance of SQL Server 2012. I used slipstreamed media which has SP1 built in. Things to note:
- I used the domain Administrator account to run all services except for the Browser, Agent and Full Text Filter.
-
Remember to add the domain Administrator account as an admin to the relevant services as you configure them in the install Wizard. You don’t want to be locked out later
These are the features I selected (pretty much all)..
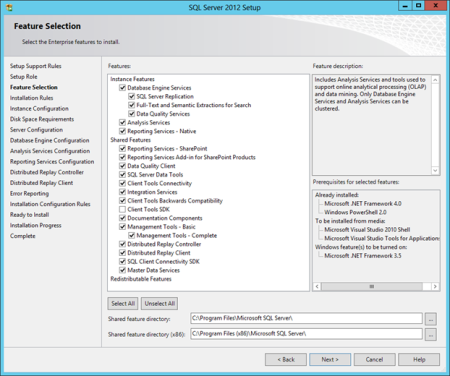
… Noting that when I configured the services, I picked Multidimensional and Data Mining Mode:

- I then ran the Reporting Services Configuration tool to setup the Native SSRS instance.
- I wanted a Tabular version of SSAS, so I ran the installer again and chose to install a NAMED instance of SQL Server 2012, which I called TABULAR. This time the only feature I selected was Analysis Services, but when asked to choose the mode I selected Tabular.
SQL Server 2012 Help
For some reason Microsoft decided not to include local help files on the SQL install media so you need to get it yourself and manually install it. It can be a bit tricky so pay attention to the instructions that follow the download:

Developer Tools
At this point I would recommend installing the following:
- SQL Server Data tools (i.e. SSDT – highly recommended)
- SSDT Power Tools (the official mechanism to update SSDT)
- Visual Studio 2010 with SP1 (if you want need complete .Net programmability)
Installing Sharepoint 2013
-
Start the SharePoint 2013 installer (autorun from the dvd/mounted ISO, or manually run default.hta). If you havent already installed the pre-requisites then do so using the option shown below:

- After pre-requisites are installed, from the install launcher shown above select the “Install SharePoint Server” option. When the SharePoint install has completed, De-select the option to run the configuration wizard.
Installing PowerPivot for SharePoint
- You will need to get back to the SQL Server 2012 installation media and run the SQL installer. Step through the usual installer screens and select the PowerPivot option when you are asked to choose the Role as shown below. Be sure to de-select the option to install the relational database (we will use the default instance we set up earlier to host SharePoint databases)

-
At the Instance Configuration screen of the wizard i entered POWERPIVOT for my Instance ID

- Step through the remainder of the installer, remembering to add yourself as an administrator when prompted. I also chose to run the service using the Administrator account.
Base setup of up the Sharepoint Farm
Instead of using the SharePoint Products Configuration Wizard to configure our farm, we use the new PowerPivot Configuration tool to do this for us. The beauty of it is it will setup a bare minimum Sharepoint farm. Nice and lean, so it will run quicker which is important for demos. I find the Microsoft supplied VMs HUGE (75Gb) and slow. Check here for my guide on how to convert one from Hyper-V to VMWare. Just a reminder that Windows 8 includes client Hyper-V which is great if you want to stay away from VMWare products for any reason.
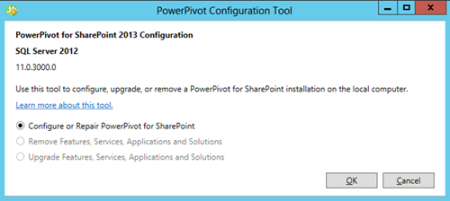
- Start the PowerPivot Configuration Tool from the SQL Server 2012 Program Group:

-
Pick the first option as shown – there will be no choice on an unconfigured farm anyway
-
The tool will perform some checks and then present you with a list of tasks. Fill in the first screen with settings to match your setup, then click Validate. You’ll see this:

At this point you could press Run and have it perform all those activities. However, whats great about this setup compared to the SQL 2008 R2 is that we can actually customise some of Service Application and associated database names to remove the dreaded GUIDs that get appended to them. You can also control some of the IIS setting such as Web Application name and App Pool. These are the tasks I suggest click on to customise:s
- Create PowerPivot Service Application
- Create Default Web Application
- Deploy Web Application
- Create Site Collection
- Create Unattended Account for DataRefresh
-
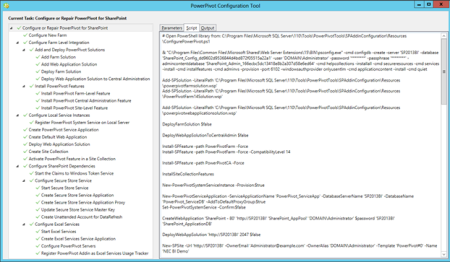
When you’ve finished customising you’ll notice it informs you where you’ve made changes to the tasks. You can click the Script tab to view the PowerShell commands that will be executed. This is great to learn from and also to save away for a future scripted setup. I can see this being useful to tweak for a proper production setup. Beware: you need to select the topmost task to get the whole script showing up. This means if you are looking to find the PowerShell commands for just a select task/task group, you can click the appropriate section.
-
Click Validate, and if successful, click Run. This will take a bit of time… If all goes well you will see this:
And you can verify in IIS that the sites were setup:

-
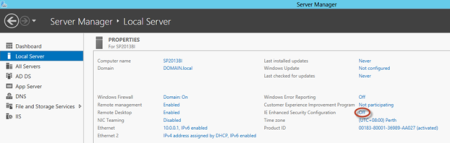
Navigate to our new SharePoint site. I usually at this point remember to turn off Internet Explorer Enhanced Security by going to Server Manager and selecting the appropriate option under Local Server
-
Finally I add the Sharepoint Site to the trusted sites in Internet Explorer.
-
So now our site should work and if you browse to it you should see the vanilla Sharepoint page configured with a PowerPivot Gallery.

There are two more components left to configure for a basic BI setup. SSRS/Power View and then PerformancePoint.
Enabling SharePoint Enterprise Features and Services
Before we try to setup these other BI services it’s a good idea to turn on other services we might need for demos and also Enterprise features for the Site Collection and Site.
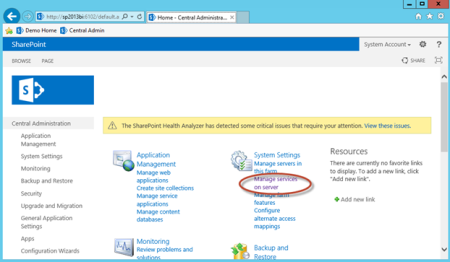
- First in Central Admin select Manage Services on Server:
In there I enabled:
- Business Data Connectivity Service
- PerformancePoint Service
- Visio Graphics Service
- Then in SharePoint go to Site Settings which is now accessed from a little “gear” icon in the top right corner of the browser window:

- Then manage the Site Collection Features:

Make sure the following are activated (Many will already be active, but ive stated all for completeness):
- PerformancePont Services Site Collection Features
- Power View Integration Feature
- PowerPivot Feature Integration for Site Collections
- SharePoint Server Enterprise Site Collection features
- SharePoint Server Publishing Infrastructure
-
Next we have to set enable some features at the Site level. So go back to Site Settings as in Step 1 above. This time select Manage Site Features:

Make sure the following are active:
- BICenter Data Connections Feature
- Mobile Browser View (if you plan to test mobile features)
- PerformancePont Services Site Features
- SharePoint Server Enterprise Site features
- SharePoint Server Publishing
Note we don’t turn on the Report Server File Sync because that is only required for SSRS 2008 R2 to synch back to the SSRS catalogue. In SQL 2012 SSRS is now a proper Sharepoint Service Application – something that was done to address performance problems in Sharepoint integrated mode.
Configuring SSRS Integration and Power View
This part tripped me up the first time. I thought I had everything working but SSRS and reports simply wouldn’t work! After some research, trial and error I understood all the components and config required to get it to work. The main problem is that with the steps we’ve taken so far, the SSRS Service itself (new in SQL 2012) and its proxy are not actually setup in Sharepoint yet.
A couple of quick PowerShell commands I found on the MSDN SSRS Integration Configuration Guide helped here, in the section entitled “Install and Start the Reporting Services SharePoint Service”. The note there explains why we don’t have SSRS services configured – we installed SQL first so there was no farm for it to configure SSRS on.
- Run the Sharepoint PowerShell as an admin:

-
Run some PowerShell commands to install the service installed, add the proxy and then start the service:
- Install-SPRSService
-
Install-SPRSServiceProxy -
get-spserviceinstance -all |where {$_.TypeName -like "SQL Server Reporting*"} | Start-SPServiceInstance
- Install-SPRSService
-
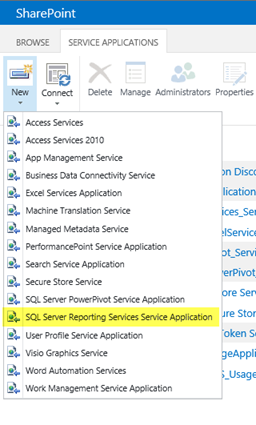
Next we can create a SSRS Service Application from Central Admin
Heres where we select the one we want:
The settings ive used are highlighted (first page):

Then scrolling down:
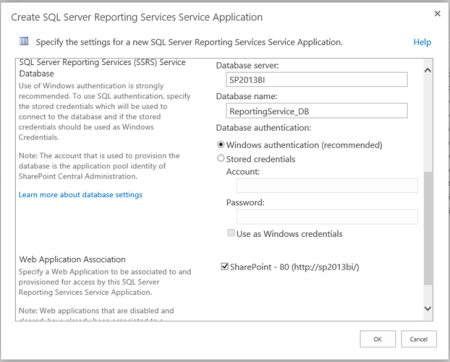
This should get you to the Success screen shown below – Click the highlighted link to ProvisionSubscriptions and Alerts.
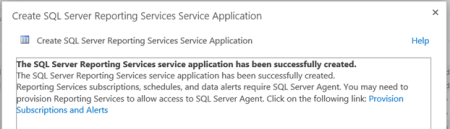
This will take us to the page below where the SSRS service account is given access the SQL Agent. Note the credentials below are sent to the SQL server.. so using the “sa” account will work here too. Note that you can create subscription and alerts if the SQL Agent service is not running – so turn it on if you want to demo this feature.

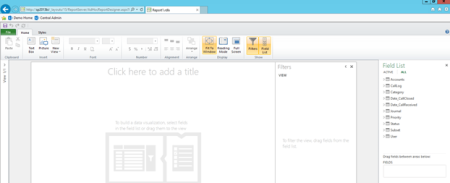
- How to test this? Make sure you have Silverlight installed and then upload a PowerPivot workbook into the PowerPivot Gallery. The Gallery has a link automatically if Silverlight isnt present. You will see a new “Create Power View Report” option in the gallery:

Clicking that will open up the Power View designer:
Configuring PerformancePoint Services
This part is much easier!
-
Verify the PerformancePoint Service is running. In Central Admin you need to go to “Manage Services on Server” (shown below) , and once in there just Start the PerformancePoint Service if it isn’t running.

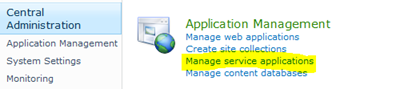
- Next we need to add the PerformancePoint Service Application. So in Central Admin once again we go to the Manage Service Applications page as we did with the SSRS service.

- Configure the service similar to how we did SSRS, shown below:
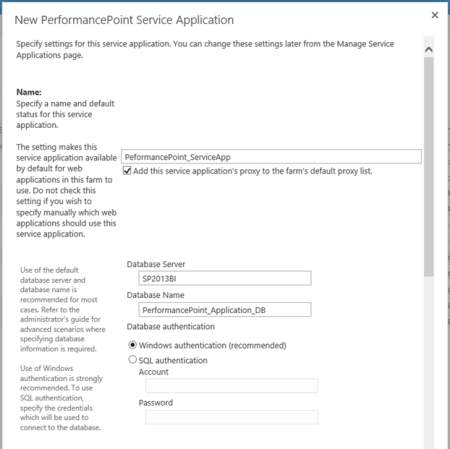
and continuing:
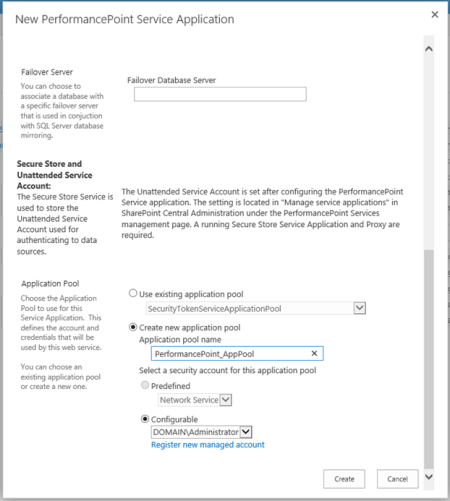
If all goes well you should see this:

- Next we need to configure the Unattended Service Account – its not absolutely necessary but a good idea to get done now. It all depends on how you plan to access your data sources – Unattended gives you the highest level of caching in PPS and the data source. So go back Manage Service Applications in Central Admin, and click on the newly provisioned service:

Once there, you need to change the app settings:

- We only need to set the account, the other settings on the page can be left at their defaults

- Its worth noting that there is a new option available in SharePoint 2013 for PPS which is to use the EffectiveUserName property in the connection string to SSAS:

Client Tools
Since we haven’t used the Business Intelligence Centre site template there will be no shortcut button to get to Dashboard designer. This can be reached via the following URL, which you can add to the site menu, a page or even customise via Sharepoint Designer:
http://<siteURL >/_layouts/ppswebparts/designerredirect.aspx
Just a few things left now to make this complete. You will need to install:
- Excel 2013 to demonstrate the now built PowerPivot and Power View
-
Excel 2010 and then the items below (I have not found any addins compatible with Excel 2013 yet!)
- Data Mining Addins
- Master Data Services Addin
- Data Mining Addins
- Visio 2013
- PowerPoint 2013 (to show export capability from Power View)
Samples
Now install the SQL Server samples if you need some data to play around with.


 Posted by bhavikmerchant


